Showing posts with label Food. Show all posts

Sunday, 19 January 2014

Chinese Takeaway DIY: the Best Sweet and Sour Chicken you will ever eat

Like most people, I love takeaways. The convenience, the rich taste, the lack of washing up! 

On the odd occasion we have an Indian takeaway I challenge myself to try a new dish every time. However, with Chinese I struggle. I love egg fried rice... But that's about it. Warm pineapple, tangy citrus flavours, stir fry- call me fussy, it's just not for me. 

Until now...

This recipe is probably the best thing I have ever cooked and beats our local favourite Chinese takeaway- I quote straight from Mr D! That is probably THE ultimate compliment I could receive from him. 


SWEET AND SOUR CHICKEN

This is now my go-to dish for dinner parties/ when the in laws come around. It's easy and it tastes amazing! It's even better reheated next day! Or so I'm told... I wasn't left any! 


Find the recipe here : http://tastykitchen.com/recipes/main-courses/sweet-and-sour-chicken-3/


Monday, 4 November 2013

Christening Cake for a Little Princess.. And other stories!

When I was asked earlier in the year to create a christening cake for one of the most beautiful little girl's born this side of Christmas, I had to say yes. 

There was no set brief except I knew it had to be pink, princessy, and classy.

Here it is: (as beautiful as it looks there is a couple humorous incidents that fell into the recipe along with the sugar, flour, eggs)..


*please note this is the result of a busy week at work, late nights, early starts, and a 25th birthday kayak down the River Thames!

Cake Attempt One: The base of the cake tin wasn't pushed down fully. As a result, half of the cake raised at a 45degree angle and the rest didn't..

As this was an expected twist, I realised I was out of eggs after the top tier batter had been made. So after much persuasion, Mr D went down to the local shop for me at 9pm for a pack of 6 eggs as I was 3 eggs short.

Cake Attempt Two: Batter made and cake went into the oven. Turned around to put the ingredients away and noticed there were still 6 eggs remaining.. Oh. I had only put 2 out of 5 in the batter. Cr*@!. 

Eventually the cake was baked, iced, and ready to go! 

At least this time I had a rolling pin... That's another cake story coming soon! 


Thursday, 17 October 2013

The Great British Sticky Ginger Loaf

Our household is a huge fan of Jamaican Ginger Cake, but it hasn't ended up in the weekly shopping for a while now. For months I have had a Ginger cake/loaf recipe just waiting to be baked, but I never quite got around to it. 

My eldest younger brother (!) George is a keen baker and is always very proud of his results from his food tech classes at school. I set him the challenge of baking this loaf on the condition that if it's good, he can take it home but only after he has baked me another one! 

The recipe has been adapted from "The Great British Book of Baking", designed to accompany the first BBC series of The Great British Bake Off, Penguin Books, 2010.


Recipe:
225g self raising flour
1tsp bicarbonate of soda
1 tbsp ground ginger
1tsp cinnamon
1tsp mixed spice
115g unsalted butter, chilled and diced
115g black treacle
115g golden syrup
115g dark brown muscovado sugar
275ml milk (not skimmed)
1 medium egg, beaten

Method:

Heat oven to 180C (160C fan assisted) 

Sift the flour, bicarbonate of soda, ginger, cinnamon, and mixed spice into a large bowl. Rub the butter into the flour mix, lightly using the tips of your fingers, until the mixture looks like breadcrumbs. The higher you lift the mix, the more air will get in, meaning a softer cake.

Spoon the treacle and golden syrup into a small pan and melt on a low heat until melted and runny, but not hot. Set aside until lukewarm.

Put the sugar and milk In another pan and heat gently; keep stirring until the sugar is dissolved. Leave to cool until lukewarm and then whisk the milk into the flour mix. Quickly add the treacle mixture and the egg and whisk until you have a smooth thick batter, similar to double cream.

Put the mixture into your prepared loaf tin. Bake in the oven for 45 minutes.

Set the tin on a wire rack to cool completely. Only remove the gingerbread from the tin when completely cool. 

The original recipe suggests you wrap the ginger loaf in foil and leave at least a day before cutting as the cake gets stickier the longer it is kept in an air tight container.

We tried this step..but after a couple hours we gave in and cut it!

The Result: the softest, lightest, tastiest ginger cake you have ever eaten. And that was unanimous!! 

Sunday, 13 October 2013

Blueberry Muffin Icecream Sundae

Despite the awful and too early winter weather, Mr D and I enjoyed a really lovely Sunday afternoon out with his parents. Unable to eat another mouth full of main course, my mother-in-law-to-be suggested the dessert menu. Now to my brain that doesn't say "No, I'm full"; it says "Of course, a new course is like starting from scratch, hunger levels go back to zero."

The restaurant/pub does an amazing Toffee Waffle, but this time a new dessert caught my eye.

Blueberries  and Icecream sundaes shout warm summer days to me. This is probably what made me go for it on this miserable October Sunday.


Summery it may be, but delicious it was too! The sharp blueberries, soft muffin bites, cold Icecream, and light cream contrasted beautifully; if it wasn't for the sound of hammering rain outside I nearly would have believed summer was here to stay!

This dessert is definitely one to recreate at home! 

Sunday, 8 September 2013

A MidSummer Cakes Dream: A secret location in Oxfordshire

The gold star for discovering this hidden world goes to my mother. Her love of rambling canal walks into the middle of nowhere combined with her English love of afternoon tea and cake made this find the perfect hidden gem. 
Hidden deep in the Oxfordshire countryside, Jane's Tea Room has to be a priority on your To Visit list. I'll admit, the name, Jane's Tea Room is uninspiring. How many Jane's Tea Rooms must there be across the United Kingdom? Well I promise you now.. this place is like no other! 
Owned by a lady called Jane (surprised?) who lives on a canal boat, the outside tea room is only open on a Sunday from 12-5. Jane owns the land, including a vintage caravan for rent and a horse! All of the baking is done using fresh and local produce where possible.

Jane's is nestled in a small village called Kirtlington, a beautiful archetypal Oxfordshire village. 
A lane disappears off the village green, shown above, heading towards the disused Kirtlington Quarry. A recent cluster of new homes is the only sign of human presence as the lane continues; the cows, horses, and smell of fresh grass overtaking the senses. The road does turn into a dirt track so make sure you are wearing appropriate shoes; on my first visit I wore slip on sandals and the gravel kept flicking up under my foot.. ouch.

Keep walking until you reach this partially hidden sign on the left of the track. To your right you will see what looks like an entrance to a private garden- enter here:

As you walk down the garden path, you will slowly leave the outside world beyond the gate. Be prepared for caged birds, dogs, and doves amongst the trees, antique road signs, Victorian style pushchairs, and a vintage record player.  The extended branches of the trees provide a canopy, and unfortunately the partial darkness did not provide the best photography light.
What I could capture were vintage tea cups hanging in the trees..

Continue down this path and I can guarantee you will soon hit a small queue of excited walkers, or those in on the secret, who are desperate for their cup of tea and homemade cake. You can choose from a selection of High Teas, quiche, soup, cakes, and scones all fresh and handmade.

Take a look at the menu below:

All of the seating is different; old picnic tables, bistro style table and chairs, covered seating with gazebos that is decorated with bunting.  Choosing where to sit is as difficult as choosing what to order!
 
 
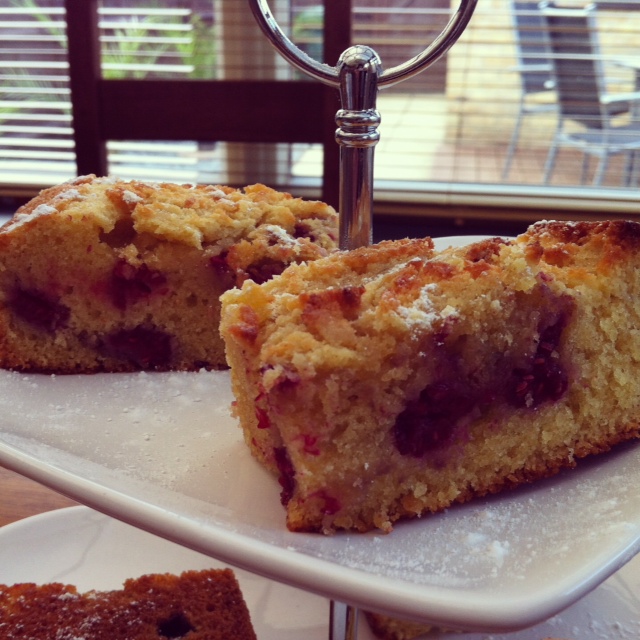
As a treat to a very good friend of mine, we decided on a slice of Raspberry cake and a Carrot and Walnut cake to share, a pot of tea, and some water. I loved my vintage china tea cup and saucer!
 
 
Make the most of a beautiful Sunday afternoon and head down there; enjoy! 

Saturday, 7 September 2013

Custard Creams Cake and KitKat Smartie Cake

My brother's 10th birthday has crept up on us so quickly. He will be driving before we know it!
Not only did he turn double digits for the first time, he had a birthday dinner with the family, and a party with his friends, so a double celebration required two cakes!
I always aim to make my cakes different to those  you buy in the supermarket.
For a young boy, whose tastes in trends change, but his love in biscuits never does, I just knew these cakes would be perfect! 

To make the Custard Creams Cake:
  • Make two sponge layers in your flavour of choice
  • Ice them together as you normally would
  • Pipe icing around the outside of the cake, filling any gaps between the two sponge layers
    (see the chocolate cake example below)
  • The piped icing will act as 'glue' for your biscuits. Stand the biscuits up against the side of the cake, pushing gently into the sponge
  • Biscuits are quite heavy; use a ribbon around the cake to keep everything in place. It will encourage the icing 'glue' to dry with a strong bond to the biscuits


To make the Kit Kat Smartie Cake
 
  • Make two sponge layers in your flavour of choice
  • Ice them together as you normally would
  • Pipe icing around the outside of the cake, filling any gaps between the two sponge layers
    (see the chocolate cake example below)
  • The piped icing will act as 'glue' for your biscuits. Place your KitKats against the side of the cake creating a fence effect.

  • When your KitKat fence is complete, pour Smarties over the top!
  • KitKats are quite heavy; use a ribbon around the cake to keep everything in place. It will encourage the icing 'glue' to dry with a strong bond to the biscuits

    *I used supermarket own-brand chocolate fingers as opposed to the brand KitKat. Supermarkets tend to do these chocolate biscuit sticks in different flavours; mint or orange chocolate for example, which can add a new dimension to your cake.

Friday, 30 August 2013

Foolproof Banana Muffins: Recipe


What do you do with those black bananas? Do you muster up the courage to peel them and eat them anyway? Not me! I eat my bananas on the green side; as soon as they are fully yellow I know its risky business. The texture of over-ripe banana is similar to that of yoghurt- and call me weird but I just can't stomach it. 


Bananas that look like this on the outside are perfect for banana bread; these are actually pretty nice on the inside, but the blacker the better! 
 
Makes 12 Muffins

Ingredients:
 
In one bowl- 
200g Plain Flour
1/2 Tsp Baking Powder
1 Tsp Bicarbonate of Soda
1/2 Tsp Salt

In another bowl-
3 Large bananas, mashed
150g Caster Sugar
1 Egg
75g Butter, Melted

*

Method:
1. Preheat the oven to 180C. Put 12 muffin cases into a tin. 
(I stumbled at  the first hurdle; having only moved into our house a month ago I assumed I left my muffin tin with the inlaws- see picture below for how I made do...)

2. Sift together Bowl One ingredients

3. Combine Bowl Two ingredients.


4. Combine the flour mix into Bowl Two and fold in gently. You still want the bananas to be lumpy!

5. Spoon the mixture into the baking cases

6. Bake in a preheated over for 25 minutes until golden brown.

The perfect banana muffin has a crisp golden shell and a moist inside sponge (make sure its the banana and not just undercooked!)


These freeze really well.. but will any be left by then?

Tuesday, 27 August 2013

Oxford Foodie Festival


Bank Holiday Weekend, beautiful sunshine, friends, and food - could you ask for more? 
The Oxford Foodies Festival could not have been timed better.

In Oxford's South Parks, open across the entire bank holiday weekend, the Foodies Festival was bound to be a success. Fresh food, novelty food, high quality kitchen tools, unusual drink concoctions, classic cider tents, and live music. This really had the potential to be a fantastic summer get- together event. The warm grass encouraged visitors to sit, drink, eat, and gossip amongst the fantastic aromas and sounds.

This was one of the quieter times when you could actually find somewhere to sit:


The summer sunshine was fantastic for us visitors; but not so much for some of the exhibitors. The preserve and chutney stalls were getting some serious attention; mostly from the fuzzy yellow and black striped little people..  With a small excited child in tow, we didn't want to approach these stalls too closely, just in case.

As a recently self-discovered macaroon fan I knew I had to try some of the home-made variety on offer. The friends I was with hadn't ever tried one before so I encouraged them to try one, my treat. I don't think Mr D quite got the full experience when he chose the bubblegum flavour (always a child at heart!). My two and a half year old niece happily devoured a pink macaroon and a few hours later at home was questioning where her next one was.. 


My next baking challenge will be to attempt my own macaroons- check back here soon for the recipe and tutorial. 

Overall, the Foodie Festival was a fantastic idea.. that unfortunately wasn't well thought out. A substantially large number of free tickets were handed out across Oxford, but they were charging £12.50 on the gate. Despite the ticket saying they could be used only once and not across all three days, the stewards at the gate purely glanced at our tickets and didn't take them off us. Not that it mattered, an hour or two was all we needed, not a whole weekend. 
Open until 7pm, it was a fantastic meeting point for those over the bank holiday weekend who wanted to enjoy the sun with some fantastic food and drink with a change of scenery. 

Next time, the festival should be a free event. At £5 a pint and over £6 for a pork roll, the events organizers could have easily made their money from the vendors. If I had been made to pay £12 entry as well, I definitely would have kicked up a fuss. A local foodies festival would also draw more punters in; there are a lot of local food and drink producers across Oxford and it would have been great to have seen more of these.  

Maison Blanc had some fantastic sweet items on offer, as did Joe & Seph's Gourmet Popcorn with an interesting 'Gin and Tonic' and 'Madras Curry' Popcorn. It was an eye-opener, if anything! 

Life is short, eat dessert first!

Sunday, 18 August 2013

Handmade Peanut Butter Jelly Icecream; aka Heaven

I have eaten peanut butter jelly sandwiches all of my life. PBJ sandwiches were a school lunchbox staple as a kid (and you thought the kids who ate marmite were weird!), and they were dinner-replacement staples as a student.
If nutritionists discovered sugar was actually really good for you then I would eat PBJ sandwiches and Haagen Daaz Strawberry Cheesecake icecream for the rest of my life. Until now. Today, I made a discovery that has changed the game completely.  Handmade and homemade PBJ icecream. It genuinely looks and tastes like the real deal. 


The discover was made at Godwin's Icecream Farm, Weston-On-The-Green, Oxfordshire.
Discovery Time: 14.00 approx.
Godwin's is an Icecream farm-cum-cafe with an array of interesting icecream flavours including Mince Pie, Irish Cream, Apple Pie, and, Blackcherry Ripple.  Look at more of their flavours here!
 
If I had space in the kitchen amongst all of my baking paraphernalia, my waffle machine, the smoothie blender, and the health grill, then I would definitely have an ice cream machine! 
Ham and Lettuce icecream anyone? No, didn't think so...


Tuesday, 13 August 2013

Pick Your Own: Raspberry Cake

Mid- August is late for me. Normally I'm one of the first to go 'Pick Your Own', strawberries and raspberries in particular. With a couple punnets of strawberries already in the fridge leftover from summer picnics, the addition of raspberries was a welcome treat. I ate so many raspberries whilst picking my own, I don't think I could have faced another fresh raspberry for a while. So what best to do with the few that made it home? Bake! 


I had seen a blueberry tray bake on James Martin's United Cakes of America which looked delicious.. until he fried it. Yuck. Heart attack on a plate? I'm sure its delicious but a slice of that is probably equal in calories to three non- fried pieces... I'll go for three! 

The sponge is a standard sponge mix:
250g butter, caster sugar, and self raising flour
4 Eggs

That's it. James Martin used 250g of blueberries, I think to keep the numbers simple, but I only used around 150g on raspberries and I think the ratio was perfect.

Pour into a greased tray and bake for 30-35 minutes on 180C/160C fan.

When cool, cut into squares, spring with icing sugar and serve. A scoop of vanilla ice cream would go great!


Waffles: The Secret Is Out

Want to know the real reason my friends keep close? Not because of my dazzling personality, the fact I don't live with my parents, or my great taste in music. Nope- it is my Gordon Ramsay Waffle Maker. Just kdding...but seriously, it's partly true...

Here is half a waffle..  yup, they really don't last long enough to capture the full beauty!


It is all thanks to Mr D that I even have a waffle maker. I absolutely love waffles so it made a fantastic birthday present some years back... but I obviously didn't love them as much as he did. I was promptly given the present the night before my birthday, so I could make him (!) waffles the morning of! 

Waffles can be anything you want them to be- simple, sweet, savoury, or gourmet. Could you tell the difference between a Belgian Waffle, a Sweet Waffle, a Gluten Free Waffle, and a Basic Waffle? 

Here is a basic sweet waffle recipe, perfect for any waffle maker:*
(*Courtesy of Gordon Ramsay)

Ingredients
250g Plain Flour
1 dessert spoon baking powder
2 tbsp caster sugar
1tsp salt
2 eggs
450ml milk
2tbsp vegetable oil
Spray Oil

Method:

1. Mix the dry ingredients together (Flour, baking powder, sugar, salt)
2. Mix the wet ingredients (eggs, milk, oil) and add to the dry ingredients. Combine until smooth.
3. Heat the waffle maker, adjusting the browning level if you have one.
4.Spray the waffle maker with oil (be generous!) 
5. Fill the sections of the waffle maker (again, be generous!)
6. Close the lid and flip the waffle maker over
7. Follow your waffle maker instructions to know when your waffle will be ready
8. Serve your waffle warm and drizzled with your favourite toppings!

My serving suggestion above is a waffle sprinkled with cinnamon and served with strawberries..
Leona this one is for you!

Wednesday, 5 June 2013

Coconut Cupcakes: Recipe

I have an amazing mother-in-law-to-be; she keeps her eyes peeled for anything that I may like or anything that reminds her of me. Recently, she came home with a recipe book called 'Cupcake Passion' with over 40 different recipes inside and lots of inspiration. 
Some of the recipes that I immediately bookmarked were Coconut Cupcakes; Low-fat Apple, Banana and Cinnamon Cupcakes, Peanut Butter and Jam Cupcakes (yes, really!), and Raspberry and White Chocolate Cupcakes.
My mother-in-law-to-be was really keen for me to try the coconut cupcakes so that was number one on the to-do list. And here is how they looked:


Aesthetically, I think they look great. Crisp, clean, and uncomplicated means easy to eat! 
The recipe, however, was an unusual one. Verdict below: 

  • 200g Plain Flour
  • 175g Icing Sugar  (I think this may be a typo error in the book.. I used caster)
  • 115g Melted Butter
  • 40g Desiccated Coconut
  • 5 Egg Whites
  • 3tbsp ground almonds (I omitted this step as I'm not a fan of any almond flavour)
  • 1tsp baking powder
  Preheat the oven to 190C
Mix all of the dry ingredients together
Add the melted butter and egg whites slowly to the ingredients so far and mix in well
Bake for 15 minutes

I am always open to trying new recipes for cupcakes as I have a classic recipe that *always* works so I'm just as keen to see what recipes don't work.
The cupcakes were ok- slightly dryer than my usual mix, although this could be down to the coconut, and the top layer of the sponge once cool was quite firm and almost created a hard layer on top. Usually my cupcakes are soft and spongy so this did make me question how good the cupcakes were. The real test will be what my work colleagues think tomorrow as they haven't yet tasted my good cupcakes!

The icing, I loved. The ratio of icing sugar [225g] to soft butter [100g] was perfect. I hate buttercream with a passion that tastes like butter. 2tbsp of hot water really helped the buttercream soften and turn into a slightly runny buttercream. I haven't perfected a buttercream quite so well as today with the help of this recipe before.
Spread the icing over the cooled cupcakes once cool. Fill a shallow bowl with the remaining coconut and roll in one cupcake at a time, side to side.

Decorate as you wish, but keep it simple and effective. A simple ribbon around the case or a sugarpaste flower on the top, as suggested in the recipe book, really does look great.

Saturday, 25 May 2013

Baby Shower Cupcakes- It's A Boy!

The first time I attempted baby shower cupcakes I had no idea just how popular they would be-  I actually felt like a proud parent (to 30!) as I waved goodbye to them!

When I was asked to do baby shower cupcakes again for a friend of my sister-in-law I jumped at the chance, particularly as these were to be blues and previously they had always been pinks!

Meet the little ones here: 


This is genuinely one of my favourite bakes and so rewarding!


Friday, 24 May 2013

Victoria Sponge Cake: Recipe

This post is what it says: a recipe for Victoria Sponge Cake. Nothing fancy, no play on words, nothing but classic cake. But sometimes what can beat just a good slice of cake?

Records show evidence of the first sponge cake (I.e. non yeasts) in the UK as early as 1615 in a wonderfully titled book by Gervase Markham
The English Huswife, Containing the Inward and Outward Virtues Which Ought to Be in a Complete Woman
With some British heritage, the Victorian sponge really should be the first port of call for any aspiring baker. 

The simplest recipe you have ever used?
Weigh the eggs and do your butter sugar an flour to the same amount.

Thats it.. A medium sized egg is approximately 50grams as a guide.. So 4 eggs, and 200g butter sugar flour with a dash of vanilla essence and a splash of milk makes your perfect recipe

Oven at 175degreesC and bake for 20 minutes exactly 

Traditionally Victoria Sponge Cakes only have jam in not buttercream as well.. The choice is yours. Just a sprinkling of icing sugar on top to finish. 

Tell me if you find a simpler recipe.. I can guarantee youl never forget this one! 


Wednesday, 8 May 2013

Princess Cake for a little Princess

Having made a Princess cake for the second time, I can honestly say it was no easier second time round. In fact, I think I had forgotten everything from the first one I made two years ago. 
But it was so worth it to see the smile on the little girls face! 

The criteria was princess, pink, girlie and big enough for a big family gathering. Mission accomplished :)

I will happily provide tips and instructions on request. Good luck!

Tuesday, 2 April 2013

Easter Biscuits 2013


Easter Biscuits are something everyone should attempt at least once. I am unable to eat cocoa so chocolate Easter Eggs are a no-go for me, plus I think the majority of the price you pay covers the packaging. I'm pretty sure if you looked at the quantity of chocolate in there compared to a standard chocolate bar the price difference would be extortionate.

As a keen baker I knew I would have to do something to replace the traditional Easter Egg... and the simple answer was that everybody loves biscuits! 

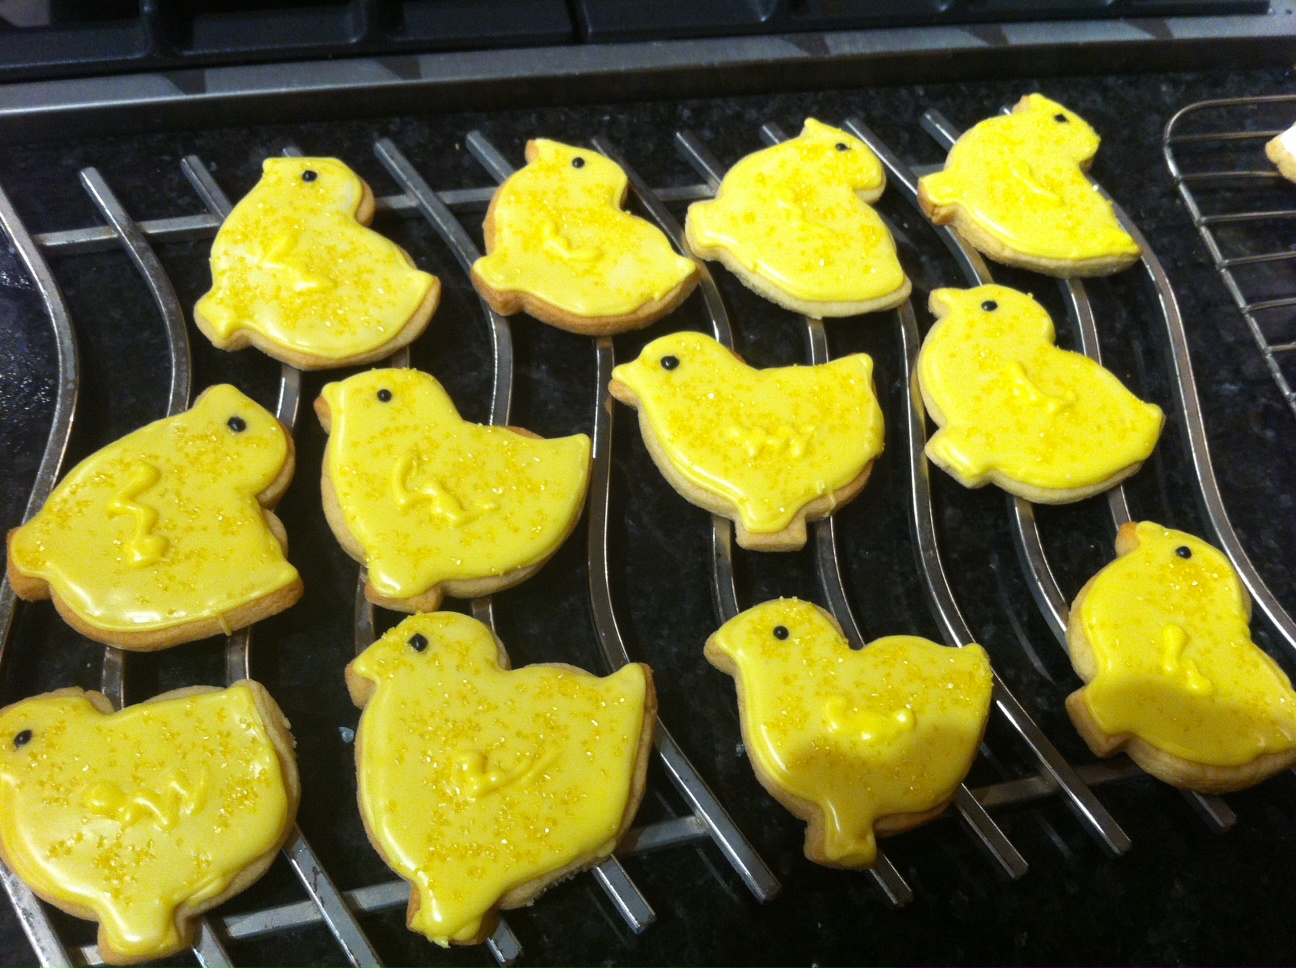
The biscuits above are as simple as it can get: easy butter biscuits covered in royal icing- that is it!

 The butter biscuits below are also covered in a royal icing. The icing also has powdered egg whites in which causes the icing to solidify quite quickly [meringue powder is an alternative but I could not find it anywhere!] 
The benefit of this is that you can pipe an outline on your biscuit, then thin the remaining icing out slightly and flood the biscuit to cover it. The piped outline stops the icing from flowing over the edges.

You can also pipe icing on top of the iced biscuit to add detail. If you want the detail to be incorporated as opposed to raised, pipe this detail first as I have done so with the ears and nose on the bunny below:


To give these biscuits as gifts your opportunities are endless; I put mine into mini brown paper bags with handles and tied the handles with an easter themed ribbon. You could also tissue wrap them.

Football Pitch Cake


Coming from a family of football fans, I am surprised I have never attempted a football pitch cake before this day! This cake was for an 8 year old boy who was having a *huge* party with nearly 50 guests so I knew this cake had to be a big one!
The sponge is a plain vanilla with a buttercream and jam filling.
 
With larger cakes, remember it is not only the overall image that is important but the smaller details. Luckily this is where my brothers came in useful to explain exactly where the mud should go on the players:

Friday, 22 March 2013

Chocolate Gift Card


Stuck on a present idea for the person who has everything? Everyone knows its the personal touches that make all the difference- they are the things that money can't buy. 
A box of chocolates has lost its sparkle-it just doesn't pass on the message you want it to.. and yet everybody loves chocolate!
So why not make the  chocolate say the message you want??

From one brother to another with the help of an older sister (me!):

Dear George, 
Acacia told me there had been a credit Crunch so I couldn't give you Money, and I didn't think you'd like a Picnic. I hope you have a Bubbly Birthday! Did you know that the older you get the more Nuts you get and your hair goes grey and Curlywurly? After this you will probably never have the Munchies again- You will probably just want to Flake out!
Happy Birthday, Love Bash (Age 9)

Monday, 18 March 2013

COD [Call of Duty] Army Warfare Inspired Cake

How do you top an Xbox cake for a boy who loves his game consoles? I was stuck with this dilemma recently as my younger brother needed a cake and despite being a year older his interests hadn't much changed! 
I decided this year it was time to specialise.. his favourite Xbox game is Call Of Duty or COD to those familiar with it. With 48 hours notice that a cake was needed from me whatever was in the cupboards had to make do.
I decided that as the outside of the cake was going to look fun but not elaborate I had to do something pretty cool on the inside:

Firstly, make plain vanilla sponge and a smaller batch of chocolate sponge.
Divide your vanilla sponge into two bowls and colour one vanilla mix in green.
Using a large spoon, dollop random spoonfuls of each sponge mix into your greased cake tin.
The more random the better!

If you want a sneak peak at how the sponge looks inside what better excuse than to cut a trench on your battlefield. I approximately cut into the cake about an inch deep as I didn't want to compromise the base of the cake: if you cut too far down it may force you cake to break.
Spread a chocolate buttercream all over your cake- again the less uniform looking it is the better as this is your 'mud' look.
Next comes the fun part- set up your plastic soldiers in combat! Although you can't see from the photo, I had all the green soldiers on the left and the grey soldiers on the right. Use the poses of the soldiers to inspire their placement.
I also used a mini remote-control helicopter for effect.
Once I had all of the soldiers in place I then filled the trench in with more buttercream and covered the base of the soldiers and some of their feet in buttercream so they really did look knee deep in mud!
Finally, for further depth, I covered cornflakes with dark chocolate and whilst the mix was still warm I spread it along the top of the trench creating a barricade.

The cake went down so well when I returned from a two day business trip there was nothing left

Saturday, 2 March 2013

Xbox Cake Revisited


An Xbox cake is probably the ideal cake for a good percentage of the men you know! Be it your brother, friend, or husband- it is a really simple but really effective cake to make.
This cake was for my brother's birthday party- more on his 'family' cake to follow. 
There wasn't a huge crowd of boys so it didn't make sense to make the cake too big so I decided on a single tier.
This was a plain vanilla sponge, with a butter cream 'glue', topped in fondant. The grey buttons and vents were hand carved with extra fondant coloured in grey. I used a pearl spray on the cake to add shine to the Xbox, making it look a lot more realistic.
And realistic it must have been as the boys seemed addicted to it... as normal with an Xbox..