Labels

Showing posts with label Tutorials. Show all posts

Saturday, 28 December 2013

DIY Glitter Wine Glasses

As the girls I work with all know, I'm currently going through a glitter phase. I use the term 'phase' loosely as I made these glasses about three months ago- and I'm still glittering! 


These are the easiest things in the world to make.. 

Youl need:

1. Wine glasses (or champagne glasses or similar)

2. Glitter 

3. Paint brush

4. Clear acrylic spray 


How to do it:

Cover your work area in newspaper, it will get messy!

Paint the area with glue that you will glitter:


Don't press the glitter on, but sprinkle over the glued areas. Do this over a bowl so you can reuse the fallen glitter.


Cover fully: this may involve covering with glitter a couple times 


Leave to dry overnight or for a couple days if possible


Finally, in a WELL ventilated area (outside!!), lightly spray the glasses with the clear acrylic spray. 
Once more, leave to dry. Only spray lightly or your glasses won't glitter as much. Spray a little mod for a Matt colour with a hint of sparkle.

Enjoy! X

Friday, 25 October 2013

DIY Christmas Gift: SNOWMAN POOP


Yes you read that correctly. Why on earth would you want to give anyone that for Christmas?
Because it's a fun treat perfect to make that child giggle when they open the mystery package!


Hobbycraft have a 3 for the price of 2 deal, or similar, on their felt and foam pieces so it was the perfect opportunity to give this gift a go.

You need (per gift)

A coloured piece of foam (cut down to A5 size per gift) 
Some coloured felt (sparkly red for Christmas!)
Some paper/card to write on
A pen
TicTacs
Twine or Ribbon 

1. Cut the foam to size; about A5 size
2. Make sure the foam is smaller than your felt piece; you want to create the look of a book
3. Glue the foam to the felt
4. Remove the Tic Tacs label and glue onto your foam
5. Write your message on a piece of card or paper
6. Glue the paper on to the foam, opposite the Tic Tacs
7. Fold the felt in half to create a seam 
7. Tie some ribbon around your gift 


Thursday, 17 October 2013

The Great British Sticky Ginger Loaf

Our household is a huge fan of Jamaican Ginger Cake, but it hasn't ended up in the weekly shopping for a while now. For months I have had a Ginger cake/loaf recipe just waiting to be baked, but I never quite got around to it. 

My eldest younger brother (!) George is a keen baker and is always very proud of his results from his food tech classes at school. I set him the challenge of baking this loaf on the condition that if it's good, he can take it home but only after he has baked me another one! 

The recipe has been adapted from "The Great British Book of Baking", designed to accompany the first BBC series of The Great British Bake Off, Penguin Books, 2010.


Recipe:
225g self raising flour
1tsp bicarbonate of soda
1 tbsp ground ginger
1tsp cinnamon
1tsp mixed spice
115g unsalted butter, chilled and diced
115g black treacle
115g golden syrup
115g dark brown muscovado sugar
275ml milk (not skimmed)
1 medium egg, beaten

Method:

Heat oven to 180C (160C fan assisted) 

Sift the flour, bicarbonate of soda, ginger, cinnamon, and mixed spice into a large bowl. Rub the butter into the flour mix, lightly using the tips of your fingers, until the mixture looks like breadcrumbs. The higher you lift the mix, the more air will get in, meaning a softer cake.

Spoon the treacle and golden syrup into a small pan and melt on a low heat until melted and runny, but not hot. Set aside until lukewarm.

Put the sugar and milk In another pan and heat gently; keep stirring until the sugar is dissolved. Leave to cool until lukewarm and then whisk the milk into the flour mix. Quickly add the treacle mixture and the egg and whisk until you have a smooth thick batter, similar to double cream.

Put the mixture into your prepared loaf tin. Bake in the oven for 45 minutes.

Set the tin on a wire rack to cool completely. Only remove the gingerbread from the tin when completely cool. 

The original recipe suggests you wrap the ginger loaf in foil and leave at least a day before cutting as the cake gets stickier the longer it is kept in an air tight container.

We tried this step..but after a couple hours we gave in and cut it!

The Result: the softest, lightest, tastiest ginger cake you have ever eaten. And that was unanimous!! 

Saturday, 7 September 2013

Custard Creams Cake and KitKat Smartie Cake

My brother's 10th birthday has crept up on us so quickly. He will be driving before we know it!
Not only did he turn double digits for the first time, he had a birthday dinner with the family, and a party with his friends, so a double celebration required two cakes!
I always aim to make my cakes different to those  you buy in the supermarket.
For a young boy, whose tastes in trends change, but his love in biscuits never does, I just knew these cakes would be perfect! 

To make the Custard Creams Cake:
  • Make two sponge layers in your flavour of choice
  • Ice them together as you normally would
  • Pipe icing around the outside of the cake, filling any gaps between the two sponge layers
    (see the chocolate cake example below)
  • The piped icing will act as 'glue' for your biscuits. Stand the biscuits up against the side of the cake, pushing gently into the sponge
  • Biscuits are quite heavy; use a ribbon around the cake to keep everything in place. It will encourage the icing 'glue' to dry with a strong bond to the biscuits


To make the Kit Kat Smartie Cake
 
  • Make two sponge layers in your flavour of choice
  • Ice them together as you normally would
  • Pipe icing around the outside of the cake, filling any gaps between the two sponge layers
    (see the chocolate cake example below)
  • The piped icing will act as 'glue' for your biscuits. Place your KitKats against the side of the cake creating a fence effect.

  • When your KitKat fence is complete, pour Smarties over the top!
  • KitKats are quite heavy; use a ribbon around the cake to keep everything in place. It will encourage the icing 'glue' to dry with a strong bond to the biscuits

    *I used supermarket own-brand chocolate fingers as opposed to the brand KitKat. Supermarkets tend to do these chocolate biscuit sticks in different flavours; mint or orange chocolate for example, which can add a new dimension to your cake.

Saturday, 31 August 2013

Polka Dot Nail Tutorial

For someone who doesn't normally wear nail polish, I certainly have quite a few bottles..
I can't wear nail polish at work because dark or vibrant colours can chip off on to the buttons of our fabulous designer dresses, so it only gets worn on my toes. So any excuse to wear peep toe heels to work! 

With a day off tomorrow I wanted to experiment; I have always loved polka dot nail decor but I don't own any specialist tools. All the tutorials I have come across ask for a certain dotting pen but what a waste of money for the amateur! 
These are all the tools you need:
  • Base Colour
  • Dot Colour
  • An old pen or pencil with a fine nib
My base colour was Lacura 520. I absolutely love this colour because it transitions across the seasons really well. This particular colour came from Aldi.. yes, you read that correctly. Interestingly I have found the cheaper brands are better quality; Chanel Gold polish peeled off instantly, but Aldi and Primark nail colours last an age!

Use an old pen, or pencil, that doesn't have much of an ink flow left.I find coloured pencils work better as the varnish you coat it with washes straight off with nail polish remover; pens on the other hand will not work as pens again!

Paint your nails with your chosen base colour.
Dip your polish brush into the jar and coat the bristles thickly with colour.
Dab your pen/pencil nib into the bristles of the nail brush, ensuring there is quite a bit of excess on there.
With a steady hand, dab in one motion on to your base coat.


Why not keep your base coat the same, but alternate the polka dot colours?
For the white I used Super Finish French White. For the Grey below I used City Grey from Marks & Spencers.


It also looks fab in a bright colour! (It would look better if it wasn't a left hand paints right hand job..yes you know the one!)


Friday, 30 August 2013

Foolproof Banana Muffins: Recipe


What do you do with those black bananas? Do you muster up the courage to peel them and eat them anyway? Not me! I eat my bananas on the green side; as soon as they are fully yellow I know its risky business. The texture of over-ripe banana is similar to that of yoghurt- and call me weird but I just can't stomach it. 


Bananas that look like this on the outside are perfect for banana bread; these are actually pretty nice on the inside, but the blacker the better! 
 
Makes 12 Muffins

Ingredients:
 
In one bowl- 
200g Plain Flour
1/2 Tsp Baking Powder
1 Tsp Bicarbonate of Soda
1/2 Tsp Salt

In another bowl-
3 Large bananas, mashed
150g Caster Sugar
1 Egg
75g Butter, Melted

*

Method:
1. Preheat the oven to 180C. Put 12 muffin cases into a tin. 
(I stumbled at  the first hurdle; having only moved into our house a month ago I assumed I left my muffin tin with the inlaws- see picture below for how I made do...)

2. Sift together Bowl One ingredients

3. Combine Bowl Two ingredients.


4. Combine the flour mix into Bowl Two and fold in gently. You still want the bananas to be lumpy!

5. Spoon the mixture into the baking cases

6. Bake in a preheated over for 25 minutes until golden brown.

The perfect banana muffin has a crisp golden shell and a moist inside sponge (make sure its the banana and not just undercooked!)


These freeze really well.. but will any be left by then?

Friday, 21 June 2013

Bespoke Gifts: Decopatch Jewellery Box and Money Box

I firmly believe that a well thought out personal gift goes so much further than a generic store bought gift. And with the arrival of a very good friend of mine's birthday, I knew the generic box of chocolates would not go  far! (Although she would deny it, she'd love those too!)

When designing a bespoke gift, the best thing to do first is brainstorm. Some people work best visually: writing down, colour swatching, image searching.. others work best mentally; thinking and thinking until the lightbulb moment flicks on!

For this very special friend Leopard print had to be involved somewhere..almost everywhere! It just wouldn't be designed for her if it didn't. I decided to do something classic and something contemporary to add a little fun to the mix. 
Below is the gorgeous leopard print jewellery box I created for her, complete with a gold coloured clasp. Inside, I wanted to add a creative twist that would add a gentle feminine and girlie flair to the bold leopard print exterior.


I've never quite understood 'modern art'; I understand it represents experimentation but the point of it? The money box below is my take on 'modern' art and the abstract; the form of the Pig represents the traditional shape of a money saving box, but the abstract patterns add a modern and contemporary twist.


Unfortunately they didn't get the same gentle wrapping that the other gifts did.. I had run out of tissue paper! But luckily as we are moving house soon there was always bubble wrap to hand. Never one to be totally normal, this sufficed as gift wrap!
They do say.. Friendship is when people know all about you but like you anyway ;)

Bespoke Gifts: Decopatch Coat Hangers and Box

Moving house, working full time, and generally living a very busy life hasn't left much time for, well, anything really! Annually I have a very busy week at a certain point in June; two best friends and my mother in law have a birthday all within 3 days, and Fathers Day falls on the Sunday. Not easy when everybody wants to celebrate at the weekend!
I haven't had a chance to post in a while so when I remembered I would soon need some fabulous presents I thought this was the perfect opportunity to get the DIY-apron out again!

One of the first things I decided to do was make some gorgeous bespoke coat hangers for my very glamorous Mother in Law's dressing room. The colours I picked represent my M in L perfectly; cool, fresh, funky, modern, and gorgeous.. with a little feminine bow to soften the bold patterns.


I also created a bespoke jewellery box which was just the perfect size for a special necklace, a collection of earrings, or anything small but precious. The same patterns add a bold hint of colour to her dressing room; the best way to freshen up a room without spending silly is accessorise, accessorise, accessorise!


Carefully wrapped in bubble wrap, then gently wrapped in tissue paper, these made a fabulous gift- so the Mother in Law said anyway... and "Mums know best!"

Wednesday, 5 June 2013

Coconut Cupcakes: Recipe

I have an amazing mother-in-law-to-be; she keeps her eyes peeled for anything that I may like or anything that reminds her of me. Recently, she came home with a recipe book called 'Cupcake Passion' with over 40 different recipes inside and lots of inspiration. 
Some of the recipes that I immediately bookmarked were Coconut Cupcakes; Low-fat Apple, Banana and Cinnamon Cupcakes, Peanut Butter and Jam Cupcakes (yes, really!), and Raspberry and White Chocolate Cupcakes.
My mother-in-law-to-be was really keen for me to try the coconut cupcakes so that was number one on the to-do list. And here is how they looked:


Aesthetically, I think they look great. Crisp, clean, and uncomplicated means easy to eat! 
The recipe, however, was an unusual one. Verdict below: 

  • 200g Plain Flour
  • 175g Icing Sugar  (I think this may be a typo error in the book.. I used caster)
  • 115g Melted Butter
  • 40g Desiccated Coconut
  • 5 Egg Whites
  • 3tbsp ground almonds (I omitted this step as I'm not a fan of any almond flavour)
  • 1tsp baking powder
  Preheat the oven to 190C
Mix all of the dry ingredients together
Add the melted butter and egg whites slowly to the ingredients so far and mix in well
Bake for 15 minutes

I am always open to trying new recipes for cupcakes as I have a classic recipe that *always* works so I'm just as keen to see what recipes don't work.
The cupcakes were ok- slightly dryer than my usual mix, although this could be down to the coconut, and the top layer of the sponge once cool was quite firm and almost created a hard layer on top. Usually my cupcakes are soft and spongy so this did make me question how good the cupcakes were. The real test will be what my work colleagues think tomorrow as they haven't yet tasted my good cupcakes!

The icing, I loved. The ratio of icing sugar [225g] to soft butter [100g] was perfect. I hate buttercream with a passion that tastes like butter. 2tbsp of hot water really helped the buttercream soften and turn into a slightly runny buttercream. I haven't perfected a buttercream quite so well as today with the help of this recipe before.
Spread the icing over the cooled cupcakes once cool. Fill a shallow bowl with the remaining coconut and roll in one cupcake at a time, side to side.

Decorate as you wish, but keep it simple and effective. A simple ribbon around the case or a sugarpaste flower on the top, as suggested in the recipe book, really does look great.

Friday, 24 May 2013

Victoria Sponge Cake: Recipe

This post is what it says: a recipe for Victoria Sponge Cake. Nothing fancy, no play on words, nothing but classic cake. But sometimes what can beat just a good slice of cake?

Records show evidence of the first sponge cake (I.e. non yeasts) in the UK as early as 1615 in a wonderfully titled book by Gervase Markham
The English Huswife, Containing the Inward and Outward Virtues Which Ought to Be in a Complete Woman
With some British heritage, the Victorian sponge really should be the first port of call for any aspiring baker. 

The simplest recipe you have ever used?
Weigh the eggs and do your butter sugar an flour to the same amount.

Thats it.. A medium sized egg is approximately 50grams as a guide.. So 4 eggs, and 200g butter sugar flour with a dash of vanilla essence and a splash of milk makes your perfect recipe

Oven at 175degreesC and bake for 20 minutes exactly 

Traditionally Victoria Sponge Cakes only have jam in not buttercream as well.. The choice is yours. Just a sprinkling of icing sugar on top to finish. 

Tell me if you find a simpler recipe.. I can guarantee youl never forget this one! 


Wednesday, 22 May 2013

My new obsession..Decopauge!

Have you seen the large Decopatch elephant or giraffe stood outside your local do-it-yourself pottery store? I have always looked at it and thought yes it does look pretty cool but when will you ever need to decopauge a Giraffe?
It has taken a few years and an inspiring friend to finally work out how I can have a go at decopauge and why I would want to. I certainly have no room for a giraffe in my house! 
My friend is amazingly talented in all areas of craft and creative skills having just finished a year touring with Phantom of the Opera in the wardrobe department... and she can knit, paint, bake, and decopauge too! So I knew she was just the person to teach me how to do it too..

With very orange wooden frames picked up at a great deal of £1 for two at a local carboot it was the perfect opportunity to give decopauge a go. The frames did come with some horrendous pictures in but my friend removed this and cleaned the frames up. Then the decopauge commenced. 

The before and after..


I am also in the process of creating some bespoke coat hangers as a gift for my Mother in Law as her birthday soon and she is the glamorous Mother in Law who loves everything girlie but has everything!

Here is a sneak preview! I will also be gluing a purple ribbon tied into a bow at the base of the metal hook to finish off the collection.

Tuesday, 2 April 2013

Easter Biscuits 2013


Easter Biscuits are something everyone should attempt at least once. I am unable to eat cocoa so chocolate Easter Eggs are a no-go for me, plus I think the majority of the price you pay covers the packaging. I'm pretty sure if you looked at the quantity of chocolate in there compared to a standard chocolate bar the price difference would be extortionate.

As a keen baker I knew I would have to do something to replace the traditional Easter Egg... and the simple answer was that everybody loves biscuits! 

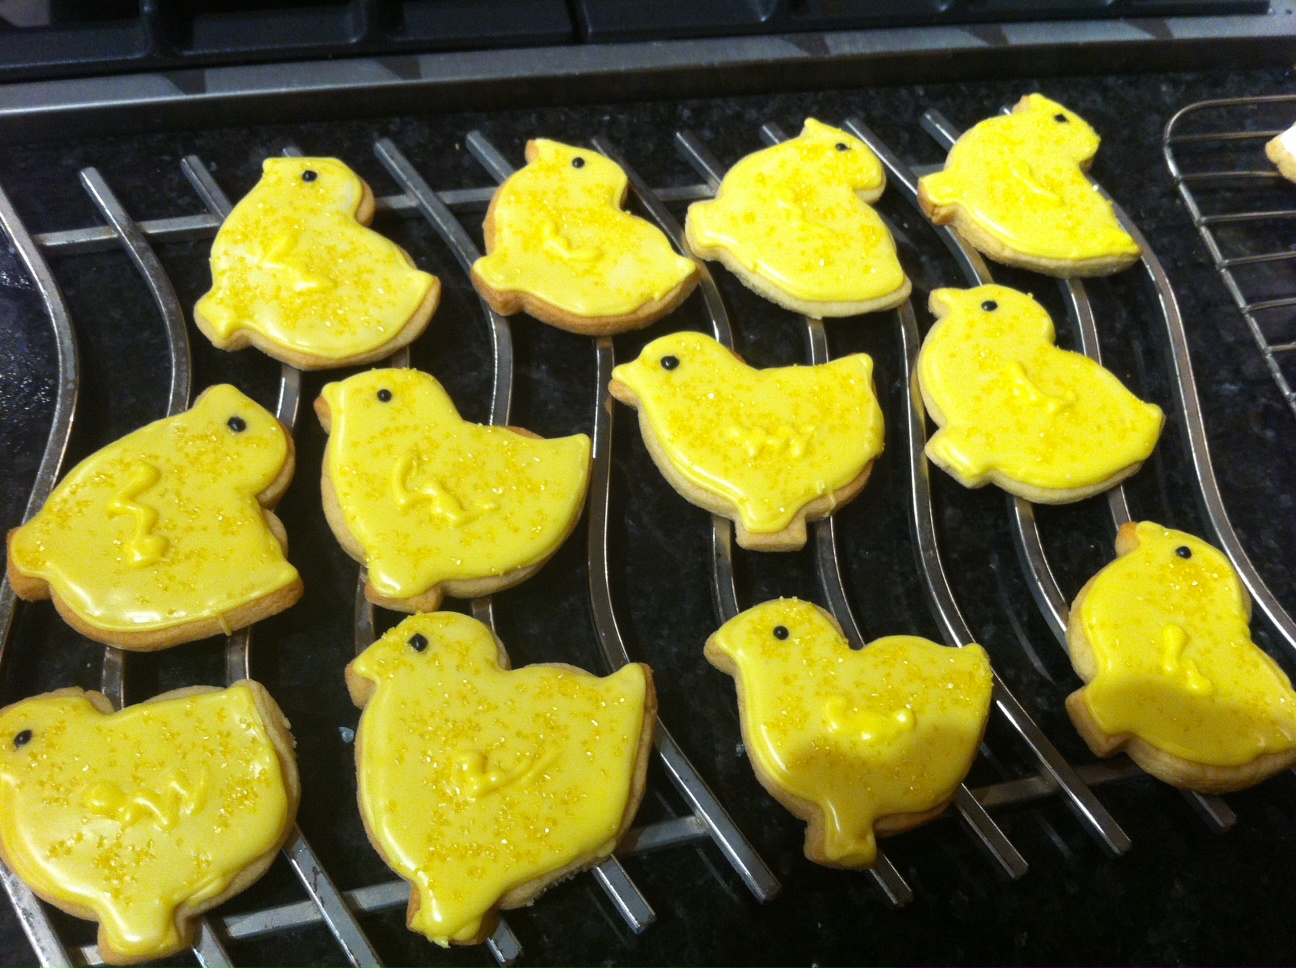
The biscuits above are as simple as it can get: easy butter biscuits covered in royal icing- that is it!

 The butter biscuits below are also covered in a royal icing. The icing also has powdered egg whites in which causes the icing to solidify quite quickly [meringue powder is an alternative but I could not find it anywhere!] 
The benefit of this is that you can pipe an outline on your biscuit, then thin the remaining icing out slightly and flood the biscuit to cover it. The piped outline stops the icing from flowing over the edges.

You can also pipe icing on top of the iced biscuit to add detail. If you want the detail to be incorporated as opposed to raised, pipe this detail first as I have done so with the ears and nose on the bunny below:


To give these biscuits as gifts your opportunities are endless; I put mine into mini brown paper bags with handles and tied the handles with an easter themed ribbon. You could also tissue wrap them.

Friday, 22 March 2013

Chocolate Gift Card


Stuck on a present idea for the person who has everything? Everyone knows its the personal touches that make all the difference- they are the things that money can't buy. 
A box of chocolates has lost its sparkle-it just doesn't pass on the message you want it to.. and yet everybody loves chocolate!
So why not make the  chocolate say the message you want??

From one brother to another with the help of an older sister (me!):

Dear George, 
Acacia told me there had been a credit Crunch so I couldn't give you Money, and I didn't think you'd like a Picnic. I hope you have a Bubbly Birthday! Did you know that the older you get the more Nuts you get and your hair goes grey and Curlywurly? After this you will probably never have the Munchies again- You will probably just want to Flake out!
Happy Birthday, Love Bash (Age 9)

Sunday, 3 March 2013

Sparkle Coloured Keys


If you are anything like me you are probably thinking "Why haven't I done this before?!" 
A simple, stylish, effective way of making important or most used keys stand out; no more faffing at the front door with your hands full trying to find the right key. You may have bought a silicone key cover but they aren't half as glamourous as these!
All of my keys are pretty dull and pretty hard to tell apart.. until now. I coated a key with two coats of glittery green nail varnish on one key, and a gold base and black glitter on the other key.
If you want glitter I would recommend using a colour in the OPI range as the base colour is really strong and the glitter is quite dense.

Monday, 25 February 2013

DIY Tutorial: Cut Off Lace Denim Shorts

 
DIY TUTORIAL


Cut Off Lace Denim Shorts


I am SO excited to wear these on my summer holiday this year! 
I have recently discovered so many old pairs of jeans at the back of my wardrobe and knew something had to be done other than just giving them away as they are really comfy to wear!
Firstly, measure your jeans at least 1 1/2" away from the crotch- you don't want them too short! As these were quite slouchy jeans I decided I wanted to keep the "boyfriend" style and make them longer than I would normally wear.  Mark across the jeans, using pins if you have them, checking both legs are even. Then cut!

I would suggest fraying the edges slightly- either use a butter knife or a seam picker to pull the threads ever so slightly as seen below:


Cut enough lace trim to cover around one leg completely with an extra half an inch on the end. Pin this onto the bottom of your shorts: it is up to you how much lace you want overhanging the shorts as seen below:


Then stitch just inside the lace with a straight stitch all the way around the leg.
Repeat all of the above on Leg Two.

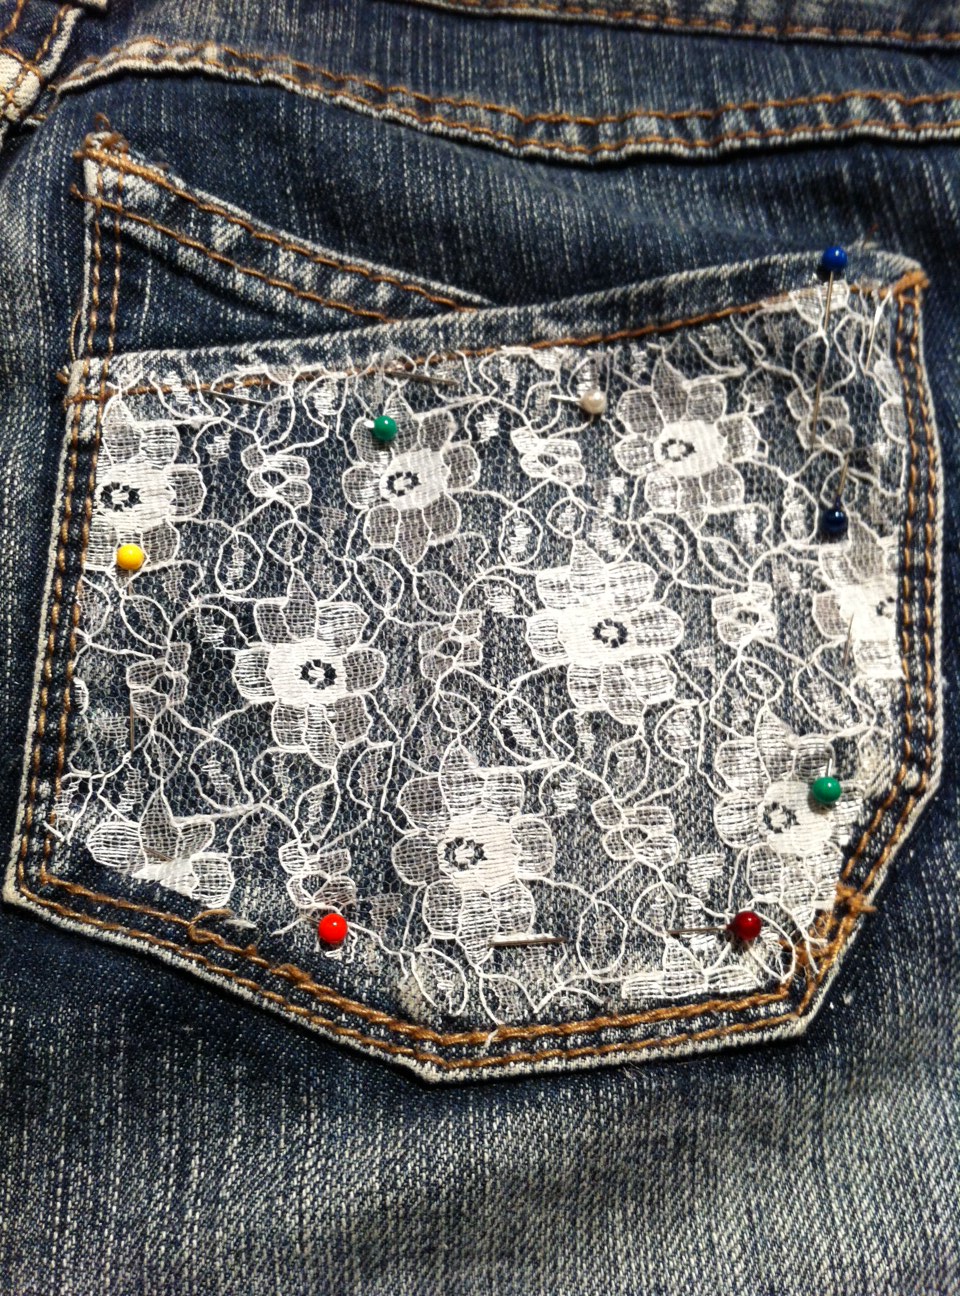
I decided to add a lace pocket on the back of the jeans for continuity. Cut some excess lace using the back pocket as a guideline on size. Pin this lace on to the pocket- make sure to just pin it to the pocket and not the entire back leg otherwise you will sew your pocket shut. 

I used a sewing machine to sew the left, bottom, and right edges and then hand finished across the top of the lace as the gap wasn't big enough to allow my sewing machine access.

Here is the finished result! [I will replace the picture with a better one but my craft room has terrible lighting in the evening]. Look back at the top of this post to see the shorts close up on the front and back!

Amazingly Simple Cupcakes: Recipe


Sometimes the best cupcakes are the most simple; to make, decorate, and eat. These cupcakes were made by my very proud younger brother who has developed a small obsession with baking since he discovered Moshi Monsters publish a magazine. In each issue there is a fantastic double page spread with baking ideas; savoury such as cheese and bacon stuffed potatoes, and sweet butterfly cupcakes. 
 
I think it's great for kids to start baking from a young age- even my 18 month old niece has assisted with making her own cupcakes! 
Cupcakes are one of the easiest things to make and great for everyone to eat! You most likely have everything in the cupboard so get baking straight away! 
 
NB: The ingredients are listed in the order they will be used but you can't go too far wrong! 
Top Tip: The butter, sugar, and eggs will always weigh the same. A medium egg is approximately 50-55g so use this as a guide line in future baking!

Set your oven to 180C 
Ingredients:
110g Margarine
110g Caster Sugar
2 x Eggs
1 tsp Vanilla Extract
1-2 tbsp Milk
110g Self Raising Flour

Method:
  1.  Cream the butter and sugar together
  2. Beat the eggs then add slowly
  3. Fold in sifted flour and add the milk
    At this point the mixture should be a creamy consistency that can drip off the back of a spoon.
  4. Spoon into cases and put in the oven for 12 minutes
  5. When the cupcakes have cooled- decorate as you please!
    The icing shown above is icing sugar, water, and a drop of milk then sprinkled hundreds and thousands!

There are no words like 'I Love You'- but why wait until Valentines Day?

Pride of place in our study
February 2013 has soon come upon us and for a lot of people, in love or not, this
 has brought Valentines Day. Although the history and tradition of Valentines Day is clouded with mystery and legends, the day is undoubtedly centered around declaring romance and love. 

Some modern cynics have dubbed the 14th February a "Hallmark Holiday". Renowned for greeting cards and popular celebration gifts, Hallmark, along with many other large card and gift corporations, certainly do cash in on Valentines Day offering everything and anything from wine glasses to interactive toys to help declare your love.Although there is no denying that card retailers benefit hugely from Valentines Day, records show that the act of gifting a manufactured card has actually been occurring since the early 19th Century, a century before Hallmark was created.

When you have been with a person long enough to have seen a few Valentines Days come and go, why wait until February 14th to let them know? And why make it cost you anything?

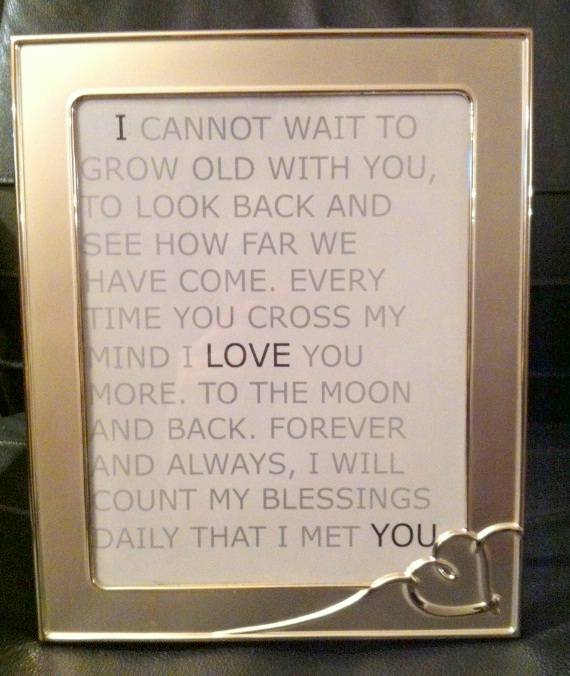
I made the print shown above in the frame and gave it to my fiance early February just to make a point it was not his "Valentines" gift but just a small something to say what we feel daily. It is similar to something I had come across on my Pinterest travels and I finally got around to ticking it off my to-do list [follow my inspiration and pin boards here]. 
The difficult part was using the words that meant something to you, whilst ensuring the I, the Love, and the You, ended up in the right place to ensure that it reads 'I Love You' diagonally. I used standard Microsoft Word, a normal laser printer, and a frame I already had. If I had a colour printer I definitely would have put the key words in red with the rest of the text in black.
I also think I would go back and centralise the text a bit more on the page; I was in a hurry to complete as I heard the Mr returning home!

Here is a close up of the text: